Installing TCPCM with IIS & Nginx
TCPCM stands for Teamcenter Product Cost Management. Teamcenter product cost management supports the cost and value engineering approach at an early stage of the development process by providing cost transparency for products and tools. It provides an enterprise-wide platform for managing calculations and thus provides the basis for standardized costing methods, models for fact-based calculations, and transparency into cost drivers.
TCPCM can be deployed as an offline client, stand-alone client version and client-server version ( 3-tier architecture ). This post describes the client and server architecture only. A typical 3-Tier installation includes an application server and a central database. The client connects through an encrypted or un-encrypted connection to the application server.
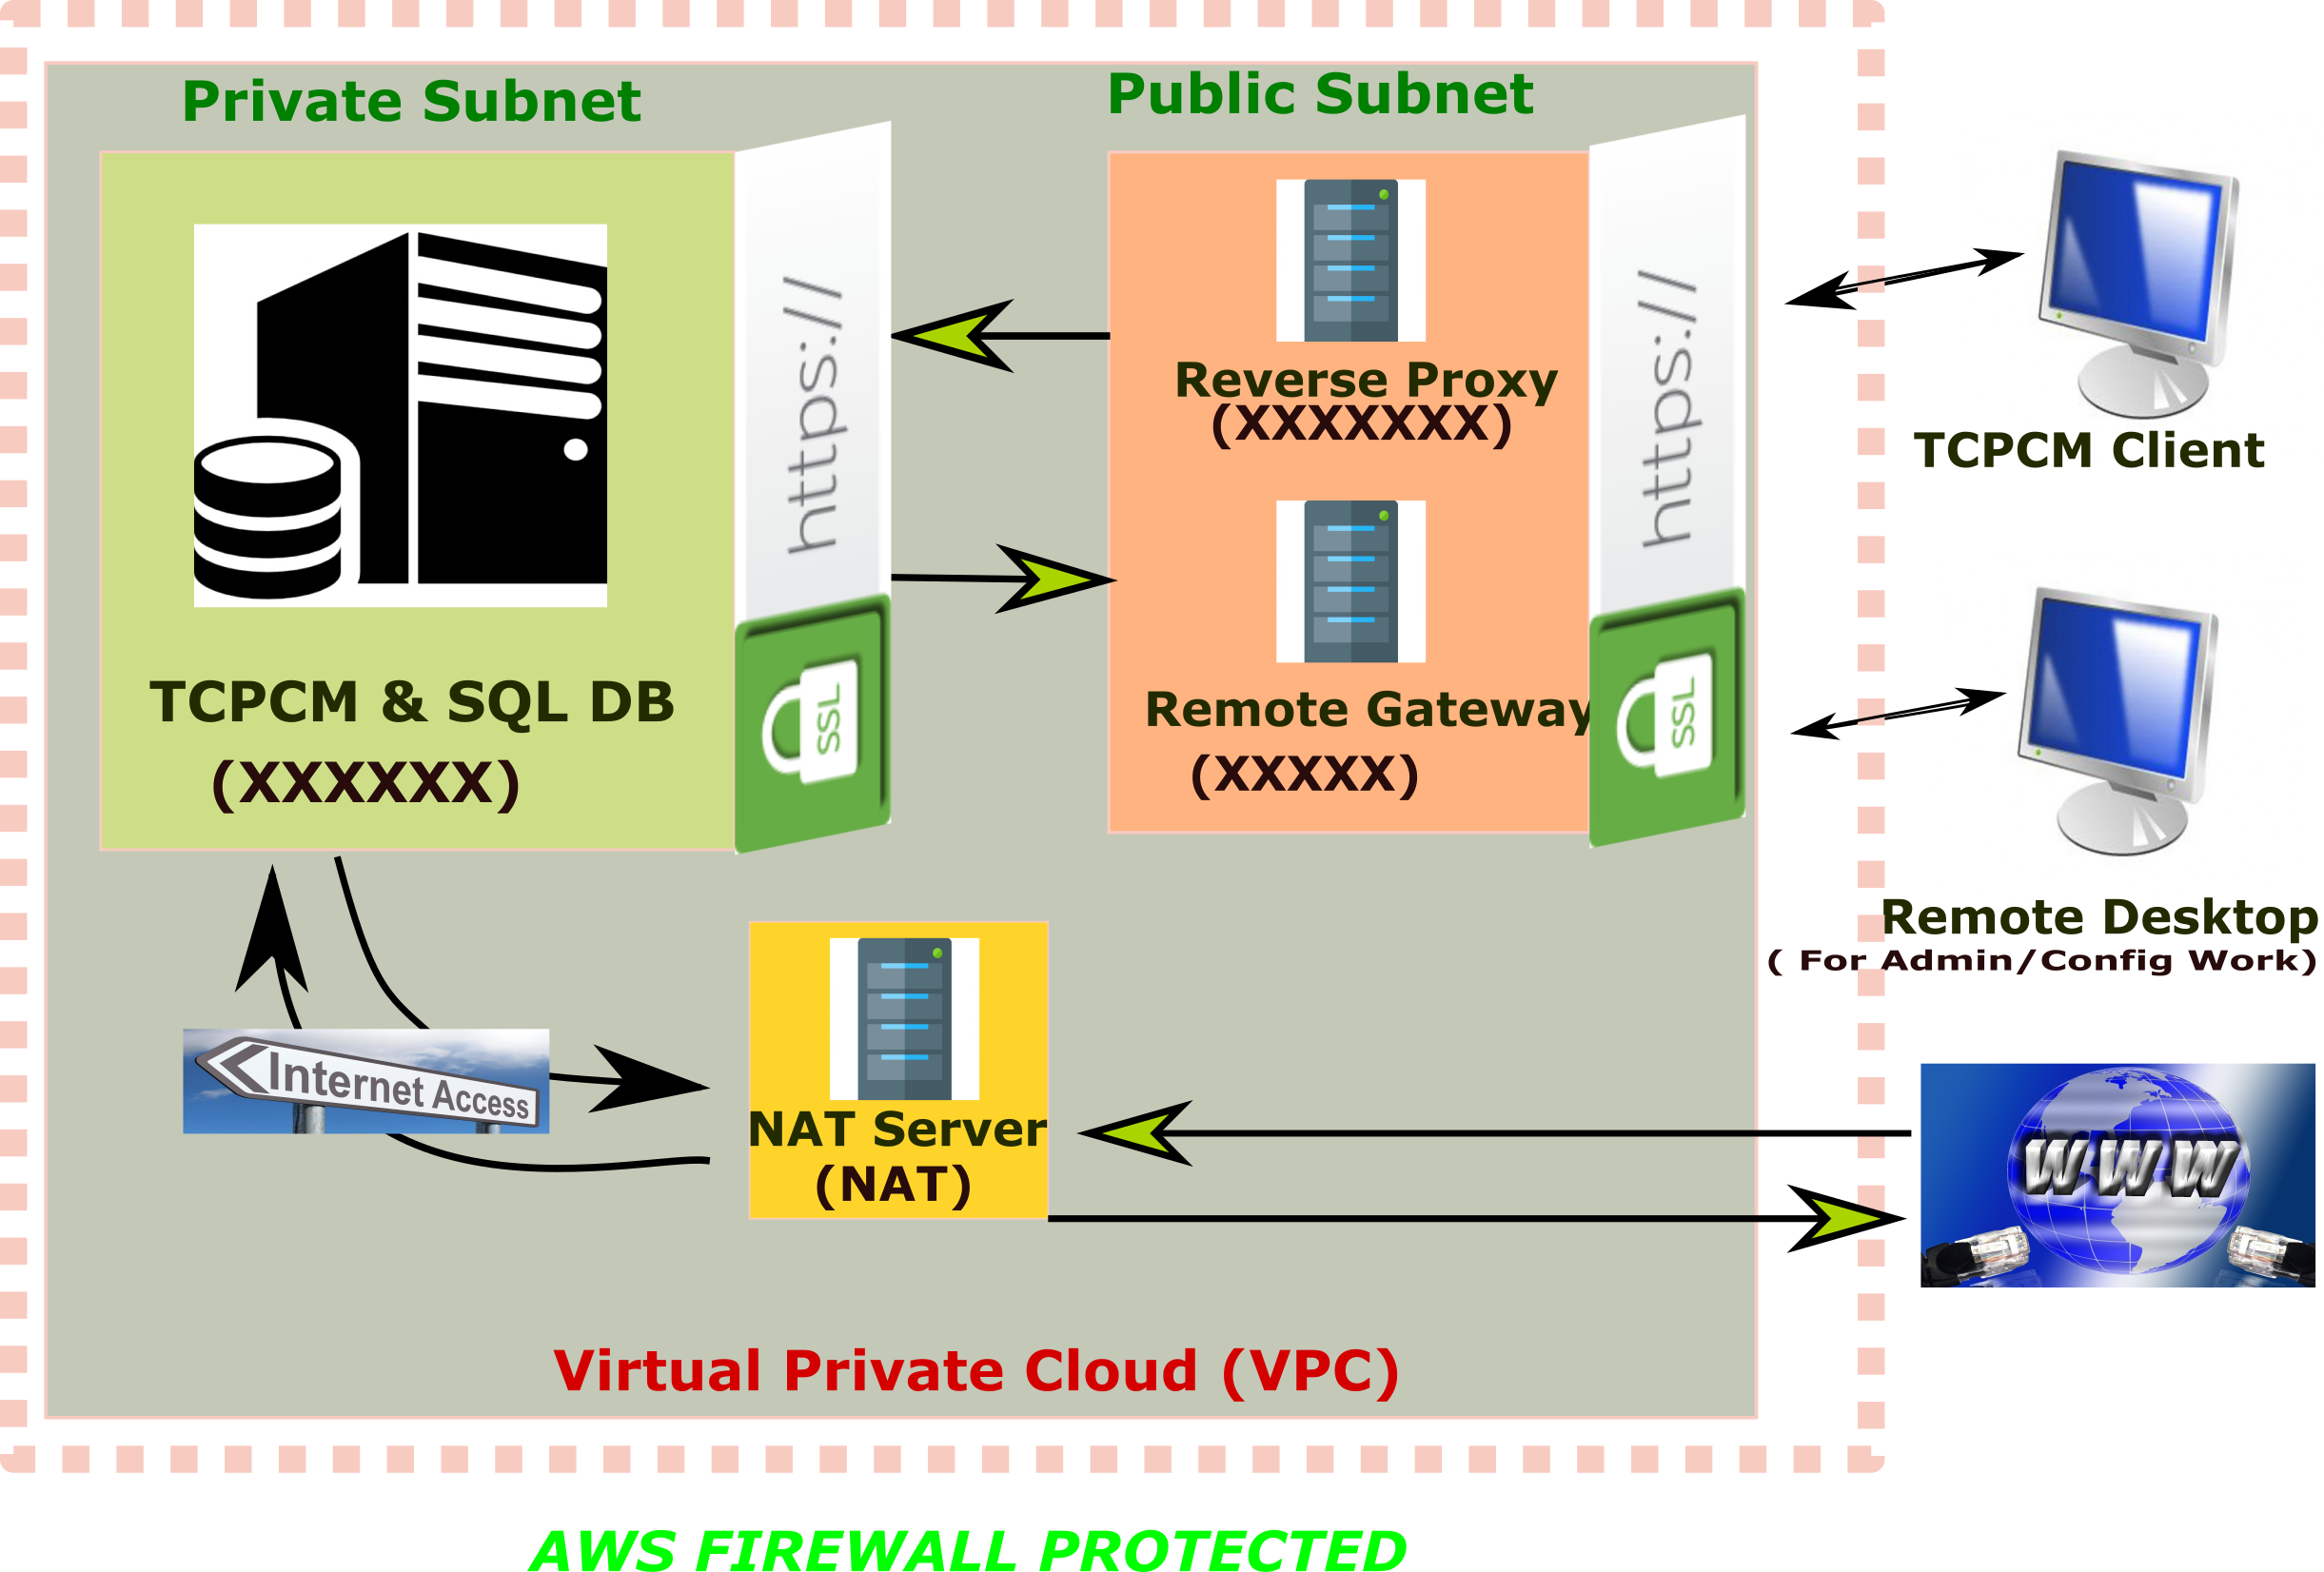
In this scenario, there is a data center cloud with an application server connecting to a central SQL server. On the other side, clients communicate through protocols (TCP/IP, HTTPS) with the reverse proxy which communicates with the Application server. The communication technology is based on the WCF Framework of the .NET Framework 4.6.2. (IIS).
Let's start the installation from Application Server.
Application Server
IIS Setup
Add IIS roles from Server manager as shown
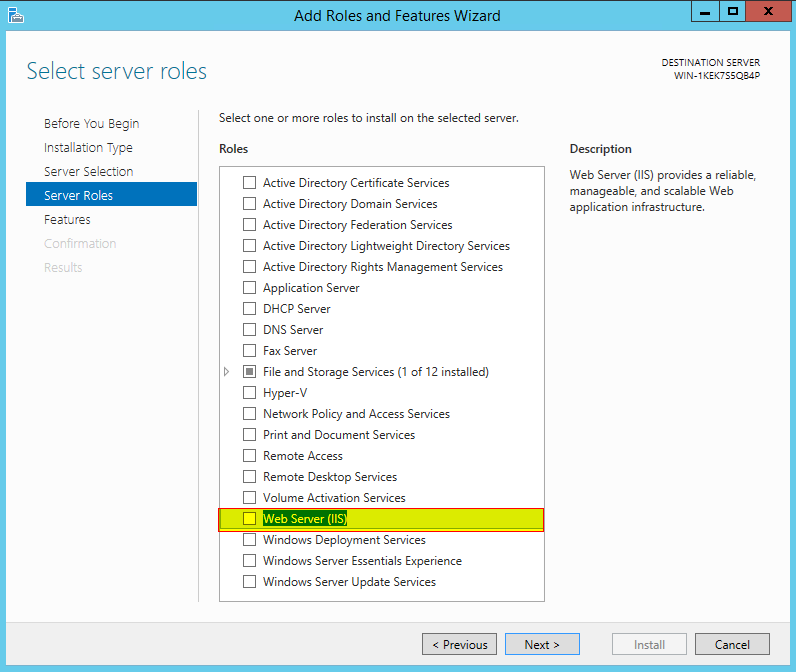
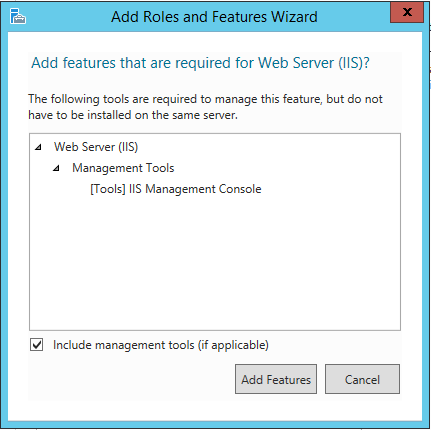
You are now back on the Server Roles Page of the wizard. Click “Next” to go to the “Features page” and install
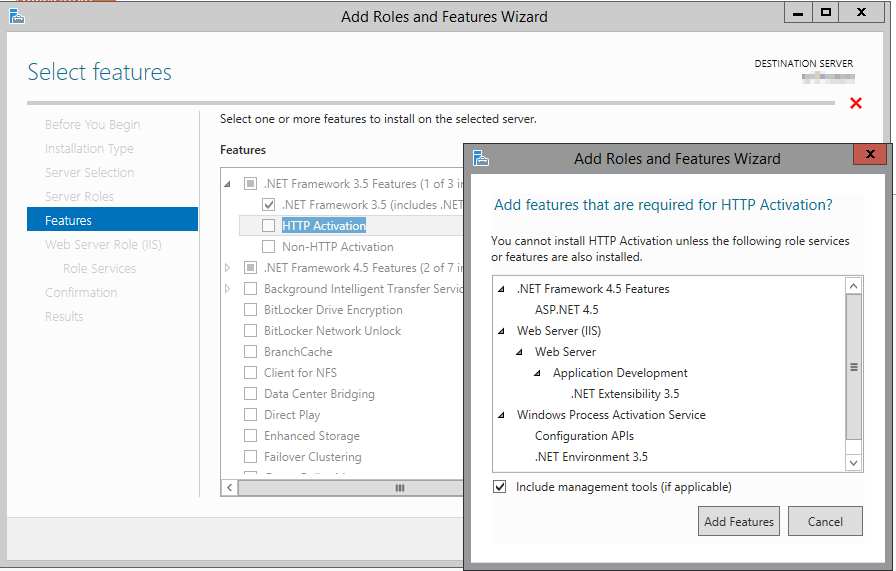
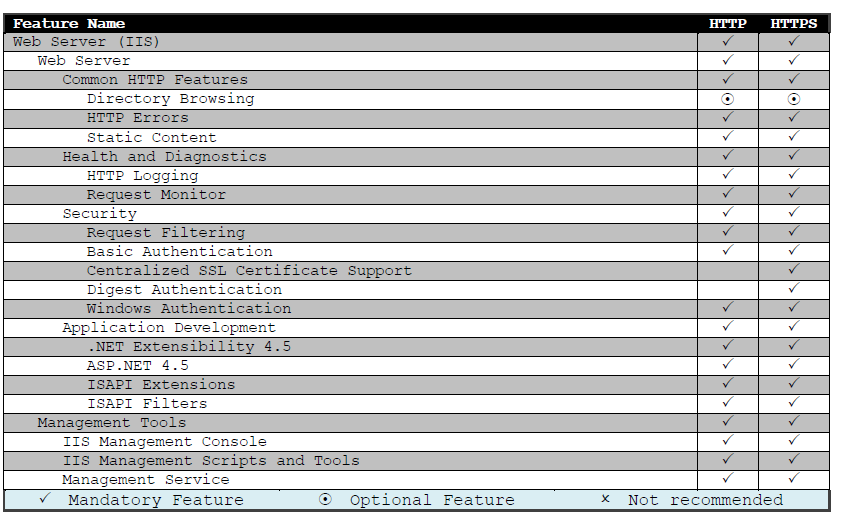
Ensure that the following features are selected:
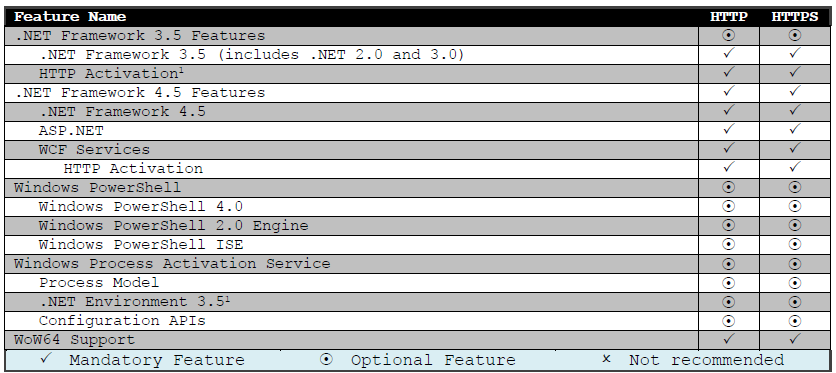
Installation or registration of .NET Framework 4.6.2
After the successful installation of the Web Server (IIS), you can install or register the .NET Framework 4.6.2 on the application server if you have installed the .NET Framework.
Please refer to the current architecture overview to check the server prerequisites. You can download the .NET Framework directly from Microsoft: https://www.microsoft.com/en-US/download/details.aspx?id=53344
To register the .NET Framework 4.6.2, open a command prompt with administrative privileges on the application server and browse to the following directory:
C:\windows\Microsoft.NET\Framework\v4.x (depending on local installation / Server Version)
Here you can run the following command to register the .NET Framework 4.6.2:
aspnet_regiis –ir
TCPCM Installation on the IIS server
Download and/or copy all the required files and folder from Siemens Website. For TCPCM, the license is required. Please contact Siemens for a license.
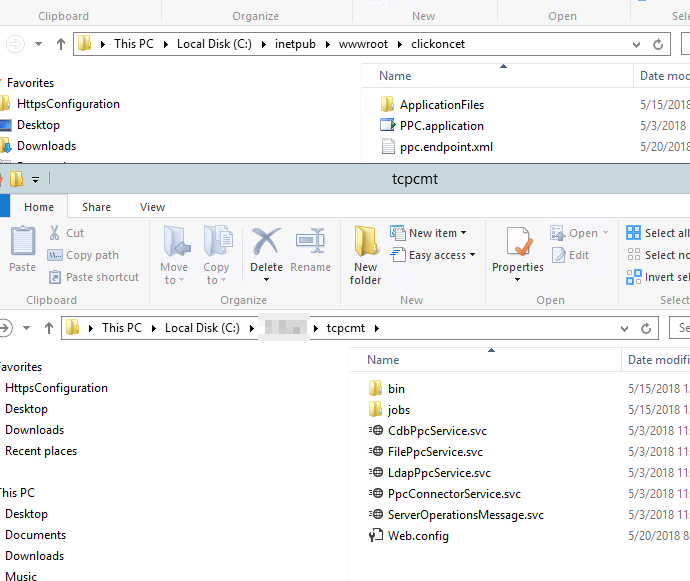
The structure of the TCPCM installation file should look like the following:

Copy all the required files as shown below.
Before we make a change in TCPCM configuration, let's perform some basic requirements in IIS server.
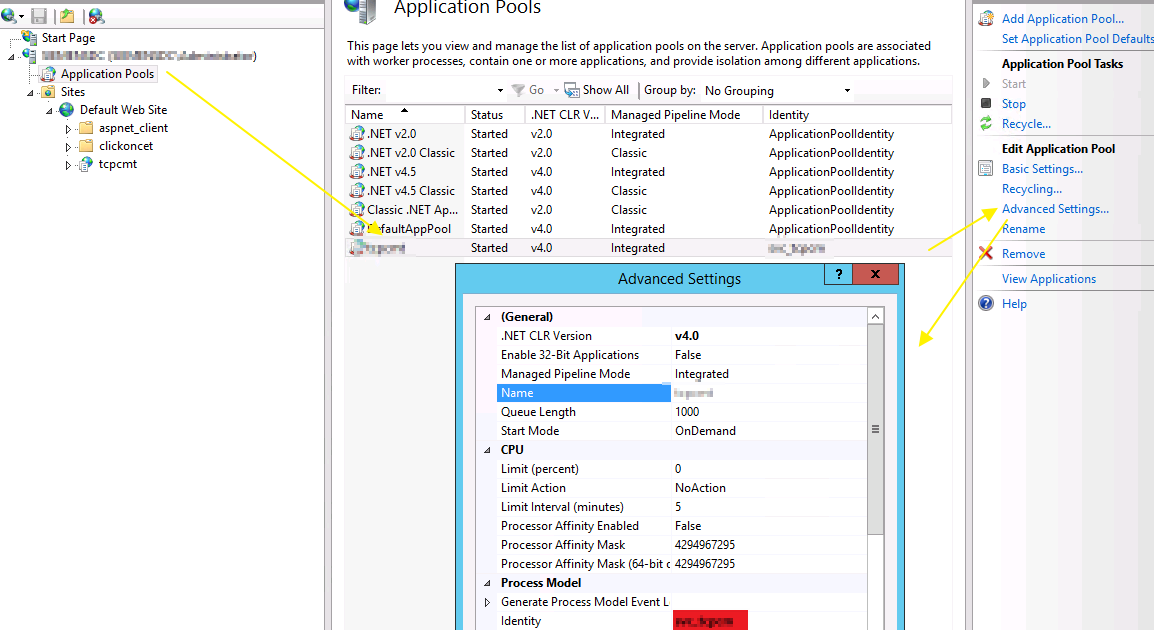
Create a new application pool with .NET CLR version 4.0 and integrated managed pipeline mode.

Click advanced settings for the newly created application pool and change identity as shown below:
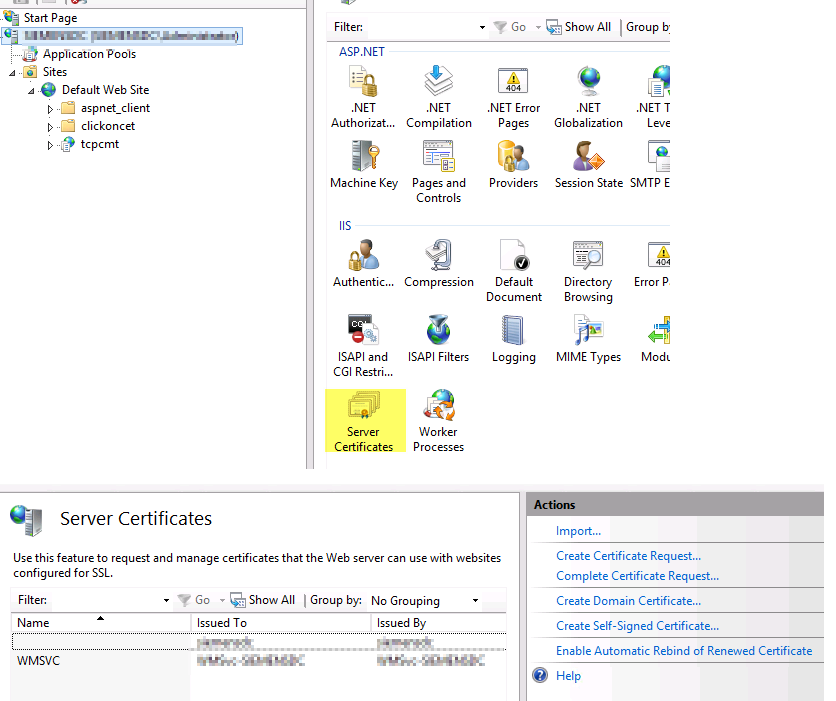
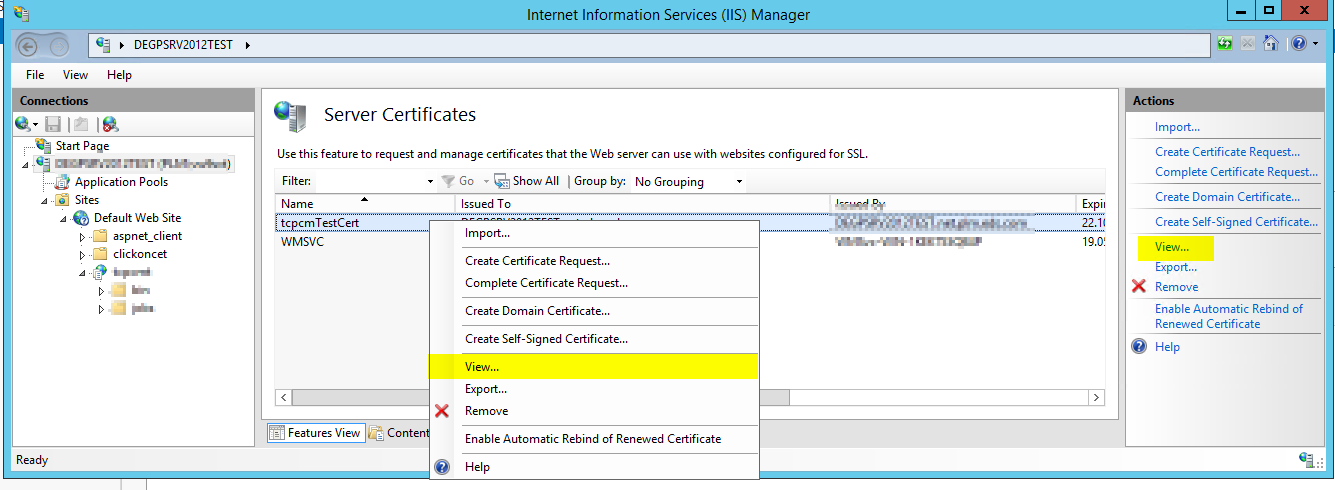
Now create your own certificate or import your company certificate before binding IIS to accept https.
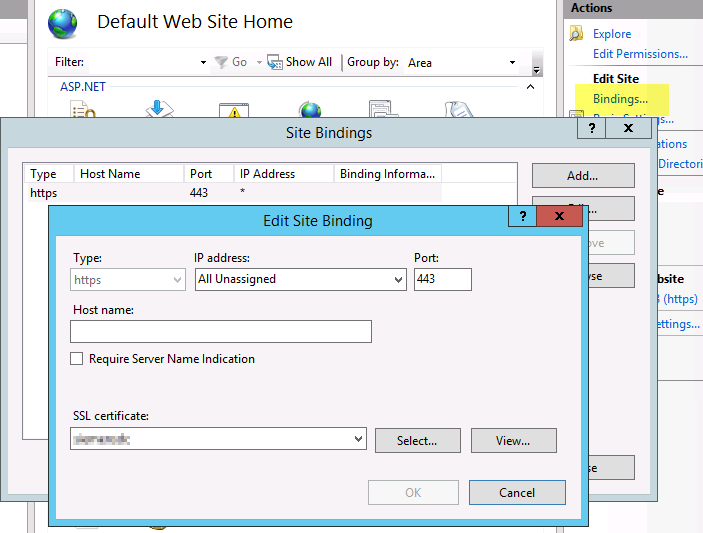
Goto Default Web Site and click Binding ( on the right corner ). Remove any HTTP binding, as we use only https. Click on "Add" and choose "https" as type, "All Unassigned" as IP address, "443" as port and choose SSL certificate.
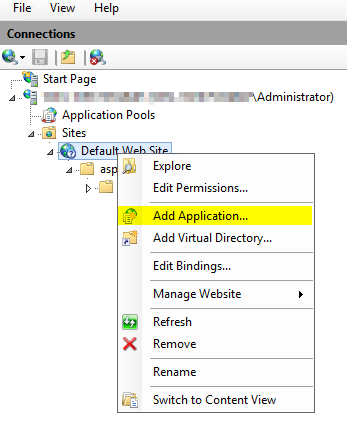
Add a new application within the Default Web Site by selecting “Add Application…” in the context menu of the Default Web Site.
Enter an alias for this application. Select newly created application pool and physical path where the application file will reside.

Select your newly-created application and select the “Advanced Settings” under Manage Application in the context menu and add HTTP,net.tcp under Behaviour --> Enabled protocols. Be careful not to add any space after HTTP,net.tcp.

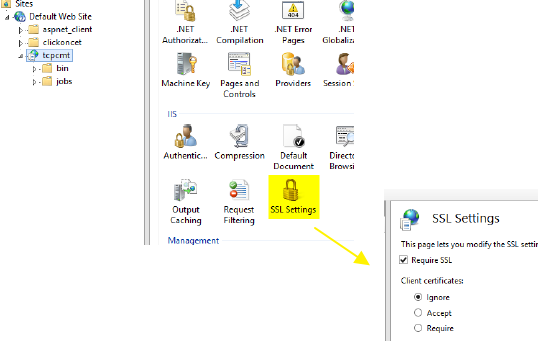
For HTTPS, enable SSL for your application by double clicking on "SSL Settings"
Now, let's go back to the application root and change some settings there.
We will use Microsoft ClickOnce self-updating technology for a 3-Tier installation. Company's endpoint and binding information must be defined in ppc.endpoint.xml ( for the client ) and web.config ( for the server ). The web.config file must configure the same binding type as used in the ppc.endpoint.xml file. The following bindings are provided by Teamcenter Product Cost Management:
● tcpcmCompressedHttpMessageBinding (default)
● tcpcmWsHttpMessageBinding
● tcpcmWsHttpsMessageBinding
We will use HTTPS encryption, that means the binding will be tcpcmWsHttpsMessageBinding.
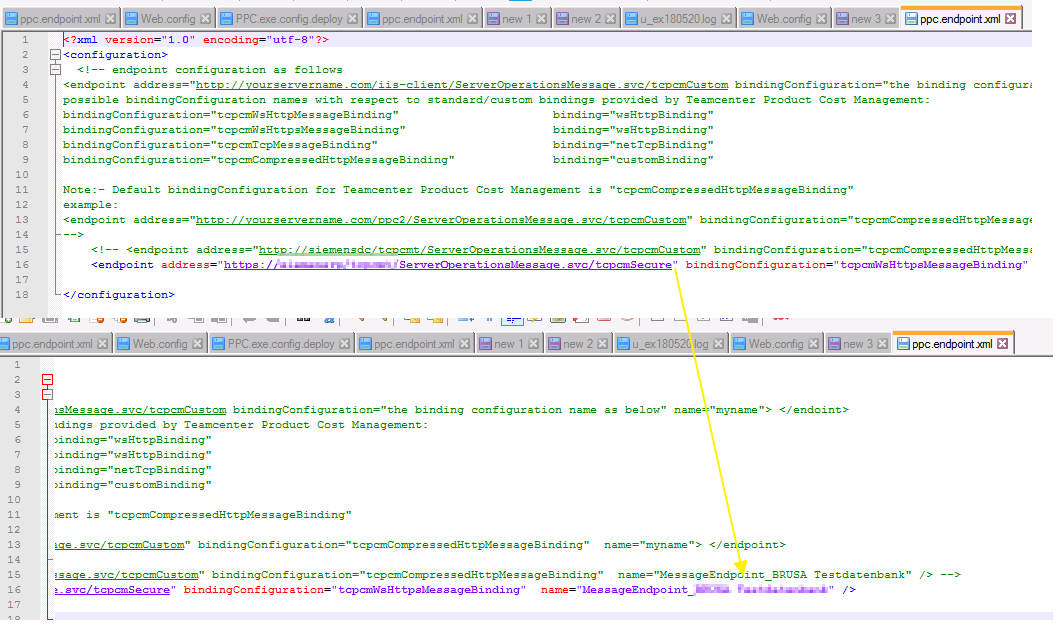
In ppc.endpoint.xml , configure the endpoint. This will change later when we configure a reverse proxy. For now, configure it with the application server name.
<endpoint address="https://TCPCM-SERVER/tcpcmt/ServerOperationsMessage.svc/tcpcmSecure" bindingConfiguration="tcpcmWsHttpsMessageBinding" name="MessageEndpoint_COMPANY Testdatenbank" />
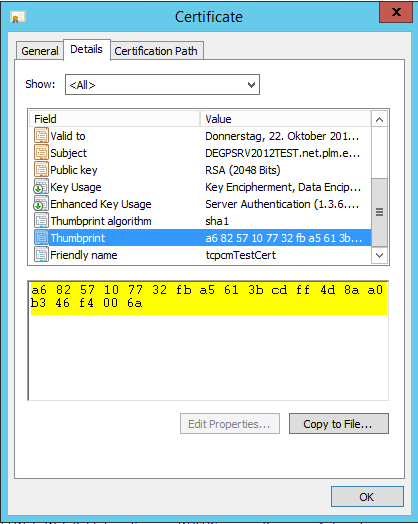
In Web.config ( needed for the server ), you need to replace certificate thumbprint and database connection.
 <value>Data Source=DB-NAME\INSTANCE;Initial Catalog=DB-NAME;Integrated Security=True</value>

 <serviceCertificate findValue="XXXXXXXXXXXXXXXXXXXXXX" storeLocation="LocalMachine" storeName="My" x509FindType="FindByThumbprint" />
For thumbprint, check your SSL certificate, that the application is using.
Use notepad editor to edit web.config because, in other editors like notepad++, unwanted characters may also get copied together.
SSL certificate must be valid to work TCPCM properly using HTTPS. The site should now display in your Internet Explorer:
ClickOnce Client deployment on server
We will roll out the Teamcenter Product Cost Management Software Client via Microsoft’s ClickOnce. We can put the content of the Client folder in any directory of the web server.
Open the Internet Information Services (IIS) Manager and right-click Default Website and select “Explore”. This will open default root. If you have not already copied the content for client installation, copy the content of the client folder ( downloaded before) inside the new folder under application root. our example, we use “clickoncet” as the ClickOnce folder.
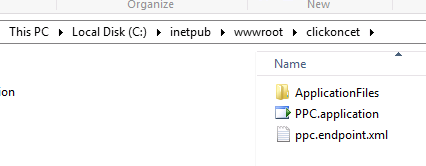
Now using ppc.application, setup new database and import the license. After that update master data. These steps will not be discussed in this post.
| FOR SSL, refer following settings as a reference for web.config file.
The encrypted binding used for connection <wsHttpBinding> <binding name="tcpcmWsHttpsMessageBinding" maxBufferPoolSize="2147483647" maxReceivedMessageSize="2147483647" sendTimeout="24.20:31:23" receiveTimeout="infinite"> <readerQuotas maxNameTableCharCount="2147483647" maxStringContentLength="2147483647" maxArrayLength="2147483647" maxBytesPerRead="2147483647" maxDepth="2147483647" /> <security mode="Transport"> <transport clientCredentialType="None" /> </security> </binding> </wsHttpBinding> <endpoint address="mex" binding="mexHttpsBinding" contract="IMetadataExchange" bindingNamespace="http://perfect-costing.com/PerfectProCalc" /> |
Reverse Proxy Settings
A proxy server is a go‑between or intermediary server that forwards requests for content from multiple clients to different servers across the Internet. A reverse proxy server is a type of proxy server that typically sits behind the firewall in a private network and directs client requests to the appropriate backend server. A reverse proxy provides an additional level of abstraction and control to ensure the smooth flow of network traffic between clients and servers.
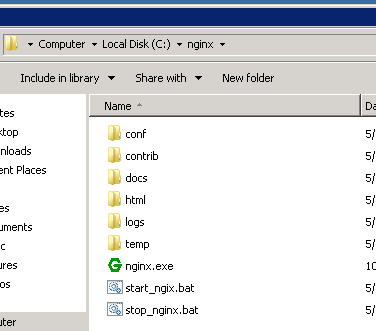
We will use NGINX as a reverse proxy. Download NGINX from http://nginx.org.
First, let's configure NGINX to start automatically when the server is started. For this, I have a Batch file which will check if NGINX is running already. If NGINX is not running already, it will start NGINX.
@ECHO OFF
REM Start Nginx
tasklist /FI "IMAGENAME eq nginx.exe" 2>NUL | find /I /N "nginx.exe">NUL
IF NOT "%ERRORLEVEL%"=="0" (
REM Nginx is NOT running, so start it
c:
cd \nginx
start nginx.exe
ECHO Nginx started.
) else (
ECHO Nginx is already running.
)
Save this file with batch extension with any name. For example start_nginx.bat
Now add this script as windows schedule a task to run when the computer is started.
Now the configuration starts. Edit nginx.conf ( %nginx_root%/conf/ ) in any editor like notepad++. See the sample config below ( only https section is shown):
# HTTPS server
server {
listen 443 ssl;
server_name siemensrp;
ssl_certificate certificate/siemensrp.cert;
ssl_certificate_key certificate/siemensrp.key;
ssl_session_cache shared:SSL:1m;
ssl_session_timeout 5m;
ssl_ciphers HIGH:!aNULL:!MD5;
ssl_prefer_server_ciphers on;
access_log logs/host.access.log;

# redirect server error pages to the static page /50x.html

error_page 404 500 502 503 504 /50x.html;
location = /50x.html {
root html;
}

location / {
root html;
index index.html index.htm;
}

location /tcpcmt {
proxy_pass https://siemensdc:443/tcpcmt/;
proxy_ssl_certificate certificate/siemensdc.cert;
proxy_ssl_certificate_key certificate/siemensdc.key;
}

location /clickoncet {
proxy_pass https://siemensdc:443/clickoncet/;
proxy_ssl_certificate certificate/siemensdc.cert;
proxy_ssl_certificate_key certificate/siemensdc.key;
}
}
|
See this file for complete nginx.conf : nginx_conf
There are two important things to consider in this configuration file. Valid Reverse-proxy server certificate is required with a key. Since application server is also working with https connection, we need to provide private key and certificate within NGINX. This enables NGINX to understand SSL request coming to the application server and reverse proxy.
Now everything is set on the server side. The remaining part is now for a client.
Get the reverse proxy certificate and copy it to the client. The certificate should be installed as "Trusted Root Certification Authorities".
Finally, ready to call the tcpcm application from the client browser. Please note any firewall ports to open such as 443 for https.
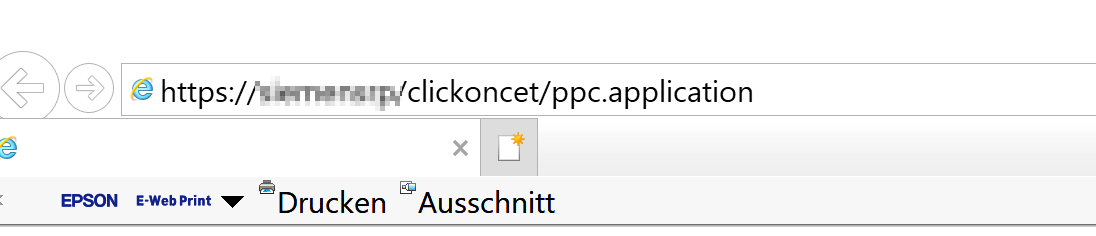
This will download the client software and will install tcpcm on the client.
The most common problem not to work from the client side is certificate error and reverse-proxy configuration error.
Good Luck everyone!